
To see if this custom-fit item will work for you please tell us what vehicle you'll use it with.


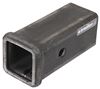
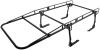
This completely hidden, custom-fit hitch installs behind your vehicle's rear bumper so that the cross tube is always out of sight. Rustproof stainless steel receiver easily removes when not in use.
Features:
Specs:
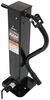
The EcoHitch Stealth trailer hitch is designed to be completely out of sight when you're not towing. The hitch's cross tube bolts onto your vehicle's frame, behind your rear bumper. No welding is required. Once installed, the cross tube will be completely concealed and only the receiver will be visible beneath your bumper. But unlike other hitches with hidden cross tubes, the Stealth goes one further. You can remove the receiver portion of the hitch for a completely out-of-sight setup. To mount the receiver, just insert it up into the access port that is built into the cross tube. Secure the receiver to the hitch with the supplied bolt and washers. When you're done towing, just remove the receiver portion to return your vehicle to its clean, factory appearance.
With a combination of aerospace-grade aluminum, steel, and stainless steel, each EcoHitch is made of a strong metal alloy that will stand the test of time. The lightweight alloy is composed of recycled materials. Traditional steel hitch manufacturing can use coal or oil, which can contribute to harmful gas emissions. The EcoHitch's recycled materials limit the carbon footprint during manufacturing, so you get a sturdy trailer hitch while also helping the environment.
This EcoHitch trailer hitch is tested for durability and sturdiness. Using Finite Elemental Analysis (FEA), individual points of stress on the hitch can be detected and remedied. Designers can accurately test the hitch to ensure that it will meet or exceed SAE J684 standards. The EcoHitch Stealth trailer hitch is carefully researched and strength tested for a durable, high-quality hitch that can resist damage while on the road.
At etrailer.com we're committed to the products we sell, and to our customers. Our experienced and knowledgeable staff are available via both phone and email to address your questions and concerns for the lifetime of your hitch. The technicians at etrailer perform hitch installations on a daily basis, making them a valuable resource for do-it-yourselfers. The one-on-one, personal service you'll receive comes straight from an expert in the towing and automotive field. We've installed it, we've wired it and we've towed with it, so whatever your question, we can answer it.
California residents: click here
Videos are provided as a guide only. Refer to manufacturer installation instructions and specs for complete information.
Hi, this is Scott with etrailer. Today we're taking a look at and installing our EcoHitch for 2025 Hyundai Elantra. The EcoHitch we have on our Elantra today is gonna be a really cool design. This one really hides away. And if you don't really use your receiver portion a lot, this one's really cool because you can actually unbolt it, remove it, and take it outta the way. And with that, the only thing you're really gonna see underneath your vehicle is just these two tabs hanging down, which are for your safety chain loops.
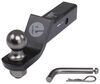
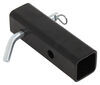
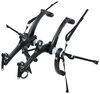
Other than that, when you do use it, it's gonna be a two inch receiver, so it's gonna be two inches by two inches. It's gonna have a black powder-coat finish on, so it's gonna hold up and be real durable against corrosion and also scratches and things like that, that you don't want to get all scuffed up and start rust. As far as weights go, this is gonna have a tongue weight rating of 450 pounds, and that's gonna be pushing down on this portion of the tongue itself. And that is gonna be the combination of your bike racks or any bikes that you have on it. Or say you have a cargo carrier, that's gonna be the weight of your cargo carrier and everything you have on that.
You are gonna have a gross trailer weight rating of 3,000 pounds, and that's gonna be the weight of your trailer and everything that you have on that. Keep in mind, you may wanna look at your owner's manual and make sure you don't exceed your maximum number in that. So just go between the lowest number of your hitch and your manual, what it says for your tow rating. This hitch is gonna have a 5/8 pin hole opening, and that's gonna take any of your standard 5/8 pins. So that's gonna what's gonna hold in any of your accessories.
What I always recommend also with these is if you do carry a bike rack around or a cargo carrier, what I like to do is have a locking pin. And what that does is that'll lock on any of your accessories. Like, say, when you're out on the bike trail, you're gonna be able to lock your bike carrier to your car so nobody can take that off while you're out on the trail. It is gonna have your safety chain loops under here. It's gonna accept your S-style safety chain loops or your clevis style hooks.
As far as measurements go, from the center of the pinhole up to the edge of the bumper, we're looking at right around 3 1/2 inches for that. And that's gonna be the number you're looking for to decide on if any of your accessories that actually fold up will make any contact with the back of your vehicle. And the measurement from the ground to the top of our receiver tube here is going to be 12 inches. And with that measurement, you'll be able to decide if you need any raise in any of the shanks of like your bike carriers or maybe a cargo carrier, just so you know that you have enough clearance. As far as installation goes, this one can be pretty tricky. You are gonna have to remove your rear fascia and a lot of your underbody panels, and there's gonna be some trimming and also drilling involved. If it's something you don't feel like tackling yourself or you don't have time, you can always take a look at our dealer locator and get something done locally for you. Or, if you feel like doing it yourself, stick around, watch our video, and we'll help you get it installed. To start our installation, we're gonna start with taking out the screws that are right here behind our fender well. We're gonna have those on both sides. They're gonna be a Phillips head screw. And we have three of them right here we're gonna need to take out. (drill whirring) (drill whirring) Now right behind our little plastic panel on both sides, you're gonna have a little eight millimeter right here. We're to get that out of the way on both sides. (drill whirring) Now we have our lower panels under here we're gonna need to remove. So we're gonna have pop clips all around the edge of this. We're gonna go ahead and get them removed. (pop clip popping) Now underneath here we're gonna have a plastic nut. This one I'm able to go ahead and back off by hand, get that one loosened up. Those are never really, really tight. And we have a 10 millimeter here. (drill whirring) And another one on the other side. (drill whirring) Now we'll just pull our panel out of place. Now we have our other panel on this side, we're gonna have our plastic nut. I just back that off by hand. And now we have more plastic clips. Work our way around. Now we can pull that outta the way. Now we're gonna have this plastic canister system. We're gonna need to get this out of the way, so we're just gonna push in on this clip. And you may need to push in pretty hard and just get a little screwdriver and carefully pop that out the way 'cause these go on there pretty tight. Now we have where we have our wire connected. We're just gonna get this popped out of the way. Use our clip tool and pop that out, and just get that put out of the way for now. Now all of our lines connected to this, we're gonna need to remove 'cause we're gonna have to get this entire box out of our way. So there are a little push fasteners in. You just push those in and pull your line back carefully. Being careful with these lines 'cause they are a plastic hard line. And we'll do that on all of these. Push 'em in and pull that back. Now we have three 12 millimeter attachment hardware here we're gonna remove those. (drill whirring) (drill whirring) (drill whirring) Now, attached to our plastic housing, we have these little metal tabs. Just want to pop that back carefully. And if you can get a little pick underneath of it to pop 'em back, that'll work good for you. Basically they just kind of hold them in place. (metal clacking) And we'll have two of those to do. Now we can just pull that out of the way and set it aside. Now on the bottom of our fascia, we're gonna have more pop clips, one on this side and two on this side, which will be your passenger's side. Now underneath the back of our bumper fascia, we're gonna have a plastic bracket here and one on the other side. Those are also gonna have our plastic clips. So we're just gonna get those popped out and out of the way, both of those. (pop clip popping) (pop clip popping) Now we're gonna need to get our exhaust out of our way. So what we're gonna do is take a cam buckle strap and just find a good location, put our hooks. Now with that, pull our strap tight. (metal clacking) Now we'll take a little soapy water. We just have dish soap and water, and spray it on our rubber isolators. We'll do that, give a little wiggle around. That's gonna work in that soapy water. It's gonna help it come off a little bit easier for us. Now we'll get our other ones back here in the back. You wanna get 'em front and back on both sides. And now you just wanna wiggle the exhaust a little bit. That's gonna work that soapy water in there and make it easier for us to pop 'em out. Now if you have a pry bar or something like that, maybe a large screwdriver, even a isolator pliers, you could go ahead and get this removed. These can be a little tricky on the inner ones up here. Once you get 'em started, sometimes you can pull 'em off by hand. Just work 'em back and forth. Sometimes lifting up on your exhaust helps as well. And just let that isolator hang there. The ones in the back are usually a little easier. I can just pop those off by hand on both sides. Now with that, we're just gonna drop our exhaust a little bit for now and just let our cam buckle strap support that. Now on the back section of our cross member in the very back of our car, we're gonna have four 12 millimeter bolts that go into the back of our bumper brace. We just want to get those removed. (drill whirring) (drill whirring) Now in the back of our hatch area, we have a panel here and a panel here. We're just gonna need to pop that back out of the way. And behind here, we're gonna have 10 millimeter attachments. Back those off. (drill whirring) (drill whirring) And once you get them to a point, be careful, you don't wanna drop those. Take 'em off the rest of the way by hand. (drill whirring) Now up and behind this panel, just follow this line and you're gonna feel a clip, and you're gonna feel an end that you can push in, push that in and pull. As you can see here, that's what you're gonna be looking for. That'll release. Now, we did have to fight with getting this taillight out. So what I ended up doing is once you're in the back of there, you're gonna have these little plastic pins. So what I did is I sprayed a little bit of some silicone on this, some silicone lubricant to try and break 'em loose. They do sit up in these pins. And we're gonna have one over here on the side. Just keep working at it and just be careful 'cause you don't want to break your lens at all. And once you get that undone, you're gonna have this rubber seal. Just pull this through, and it'll come out for you. Just pop it through and then you can pull your whole harness through. Now we have a plastic clip and a 10 millimeter on each side. We're just gonna get those out of the way. (drill whirring) Now we just wanna work from our fender well and start pulling back carefully, and it'll just pop right out of there for you, working your way up. Work our way across. Now we're gonna have one plugin we need to undo. Push in on the clip, pull up. Now we can remove our fascia. What we ended up doing, instead of going by the measurements is we ended up getting our hitch kind of dry fit in place, and we got it tapped back all the way against here. And we marked our holes. And we did the same thing on the other side. Now where we marked our holes, we drilled out our half inch holes, and this is where our hardware's gonna be going. But now, we gotta figure out a place to fish our wires. On this side, on the passenger's side, we have a spot here in the back. We would actually go through here, or this rubber plug on the bottom. So what I'm gonna do is go through this spot on the bottom 'cause I'm gonna have to do the same thing on the other side. So it'll make it easier for you guys to follow along and do the same thing I do on both sides. Now we're gonna take our fish wire and just put a small bend in it and we're gonna run it through our rearmost hole, and just want to feel for the fish wire to come through the frame to me. And when it to me, just grab the coiled end and pull that through. Now it was a little tricky, so what I did is just used a magnet to poke up in there. Now, for our hardware, we're gonna take the washer that has the teeth on it, we're gonna put that on the bolt head and we're gonna run that onto our spacer block. Now we'll take our bolt and run that onto our fish wire. We're gonna run that up right about to there. And now we'll take our spacer block and our washer, and push them up the bolt through our access hole, up and through into our frame. (metal clacking) Now, for now, we're just gonna let this hang out. We are gonna have to push these back in when we get our hitch pushed up into place. Now we'll repeat the same step we just did for our other three holes. Now with an extra set of hands, we'll get our hitch put in place. We just want to get our fish wires in our corresponding holes. Run them through, inside out. We do have our bolts pushed in. (metal clacking) Now we can lift our hitch up into place. Just want to pull your wires as you go. (metal clacking) Now we just want to get our fish wires off of our bolts. These can be a little tricky to get through. You will have to bump your hitch around a little bit with a rubber mallet. That's what we used just to get it to go in place. You just wanna get your fish wires off. Now we're gonna go on with a large washer, follow that with a lock washer, (metal clacking) (metal clacking) and a nut. Now we have all of our hardware in place. We're come back through and snug everything down. (drill whirring) (drill whirring) (drill whirring) (drill whirring) Now we'll come back through and torque down our hardware to the specifications listed in in our instruction manual. If you don't have a torque wrench, you can pick one up here at etrailer, or you can take a look at your local parts store and you can rent them there. (torque wrench beeping) Now we'll come back through and start getting some of our components back in place. I'm gonna start with our box that we took out from underneath, and just get some of the hardware started in place for that. Now we can get our electric connection re-plugged in, make sure we get a good snap. Now we'll start popping all of our hose back in place. These are gonna just pop right in place for you. Just make sure you hear a good audible click. And don't forget to get the rubber plugs put back in place where we went through our access holes. Now we'll get our exhaust put back in place. What I like to do is go ahead and read, spray those with soapy water, and it's gonna make it a whole lot easier for us to get those pop back in place. Now with those back in place, we can remove our cam buckle strap. (metal clacking) Now on our main fascia underneath, we have it marked out where we're gonna make our cut. We did make our measurements and just kind of mark out where we're gonna be making it. I'm gonna use a rotary cutting tool and just cut it out, and we're gonna test fit it and see how it looks. (oscillating tool whirring) (oscillating tool whirring) One thing to keep in mind when you're making cuts to your face, make sure you don't have a kick sensor, or anything underneath, or any kind of wires that you're gonna cut through. So always look behind where you're gonna be cutting and make sure there's nothing there that you're gonna cut through that you don't want to. Now we have everything put back in place and we did get all of our clips in and we got all of our little holes cut that needed to get cut. We got the slots cut for where our safety chains go. And you can see where our hitch is gonna plug in right here. Now I'll take our removable portion of our hitch and get it slid into place. It's gonna line up with the hole in there. And you're gonna have our bolt with our washer and our lock washer. Now we're just gonna snug down our bolt with a 24 millimeter ratcheting wrench. And you can come back through and torque it down to the specifications listed in your instruction manual. (ratchet cranking) (torque wrench beeping) And that was a look at our EcoHitch for 2025 Hyundai Elantra. I'm Scott with etrailer, and thanks for watching.

Do you have a question about this Trailer Hitch?
Info for this part was:
At etrailer we provide the best information available about the products we sell. We take the quality of our information seriously so that you can get the right part the first time. Let us know if anything is missing or if you have any questions.


Thank you! Your comment has been submitted successfully. You should be able to view your question/comment here within a few days.
Error submitting comment. Please try again momentarily.